Today I started editing my piece. Like I said in my prior blog, I had much less time to edit due to the delay in my second interview and a trip I was out on for part of this week; however, I did end up beginning to edit today, so I will be talking about it in this blog posting.
Before starting on what I did today, I want to say that I did some pre-editing late last week. Basically, what this is is preparing yourself for editing so once you actually begin to edit the process goes much smoother. This can range from learning from scratch or refreshing your editing software to adding clips and placing them into the editing slot. If you want to learn more about what it is, I actually made a blog about this for my last year's portfolio project here, so you can understand more about the concept if you didn't understand it. Similarly to what I explained in that blog, I imported my videos from my 2 different instances where I filmed (each of my interviews) only a day or two after I filmed them so I made sure I at least had them safe on my computer. After this, I placed both clips in the editing strip (I don't know what to call it exactly, but basically where you can edit things together), and I mentally prepared myself for editing.
Something I'm not sure if I mentioned in a previous blog, but after receiving some feedback from my previous in-class documentary project, I learned using a phone or another device to record the interviewee's voice at the same time as the video recording could help make the noise and speaking be clearer and have less background noise. So, I did that for both interviews, and part of my pre-editing, was lining up the two (the video and the voice recording) and then deleting the audio from the filmed video. I honestly didn't believe that there was going to be a huge difference, but there was a very noticeable difference in the crispness of the interviewee's voices.
Anyway, moving on to the real editing I did today, I didn't actually do much. Although I technically haven't gotten very far into the editing process yet, I do believe that the sections I've completed so far are super necessary and basic and it is good that I have gotten them out of the way. Before diving into exactly what, I've come to realize that I have a specific order and process within editing that I have stuck to for these past 2 years, so this order is what I will be telling my process in.
- - - - - - - - - - - - - - - - - - - - - - - - - - - - - - - - - - - - - - - - - - - - - - - - - - - - - - - -
Cut and Color:
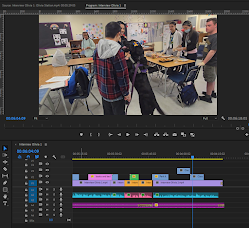
The first thing, apart from placing the film sections into the editing strip, I always do with my projects, including this one, is make sure I only have what I want. This process can take a long while, especially with a longer project. Today, it took me around one and a half hours to do this since I had a total of almost 10 minutes' worth of interview footage. What I mean by cut in this section title is selective editing. I know I talked about this in a previous blog where I mentioned that although it is almost impossible to make a piece without selective editing, I wanted to try my best to keep the information conveying the same message. I think I did this process well since most of the sections I cut out were either entire questions I didn't necessarily like, sections where the interviewees were repeating themselves, or sections I thought were going on for a little too long. Below, you can see that although I did often cut my clips, I still tried my best to maintain the clips as long as possible. Some of the cuts might have even been due to a pause, a stutter, a breath, or an 'um' from the interviewee.

Although after this stage I have technically finished the cutting section of my process, I always end up having to cut out more sections once I organize my piece, due to repetition or misfitting information. However, after finishing cutting my footage up for now, I move onto the coloring stage. I made this a very important topic in almost all projects where I have to document my process.
Coloring my piece clips not only soothes my aesthetic mind, but it also helps me be way more organized with my piece. In the picture below, you can see how much I use distinct colors to help me immediately recognize what section or aspect of the piece I am looking at.
Purple: Deputy Danielle Quinones Interview (Visual)
Teal: Deputy Danielle Quinones Interview (Auditory)
Orange: Deputy Tony Sun Interview (Visual)
Hot Pink/Red: Deputy Tony Sun Interview (Auditory)
Yellow: Question Asking
Green: B-roll
Lighter Pink: Labeling/ Intros
I know this color coding may seem excessive, but the more I edit this piece, the more it grows on me and helps me save time.
Another thing that kind of fits into this topic is the vertical organization. Basically, this means assigning a role to each row of the editing software. Obviously, it can be seen that the top row consists of the B-roll (or what I have added so far) and the next one down is the visual interview footage; however, what I wanted to point out was the yellow audio sections. These sections relate to my interview questions audio. You can see that all of those audio pieces are on a separate row. This is also a technique I use every time I edit and use sound while recording that I don't actually need for my final product. What I do is keep the audio file, in case I need to listen to it and understand what the question I was asking was, but mute the row, so when I'm listening to the product, I can't hear the sections. Also keep in mind, that I will be deleting the yellow sections once I'm fully done, but before organizing I like to keep them there that way I remember what questions go with what answers.
- - - - - - - - - - - - - - - - - - - - - - - - - - - - - - - - - - - - - - - - - - - - - - - - - - - - - - - -
Typically, the next step would be organizing the clips and intertwining the two interviews; however, since at this point in the day it was already pretty late at night, I decided to do one more thing that would take up less of my time instead.
Titles:
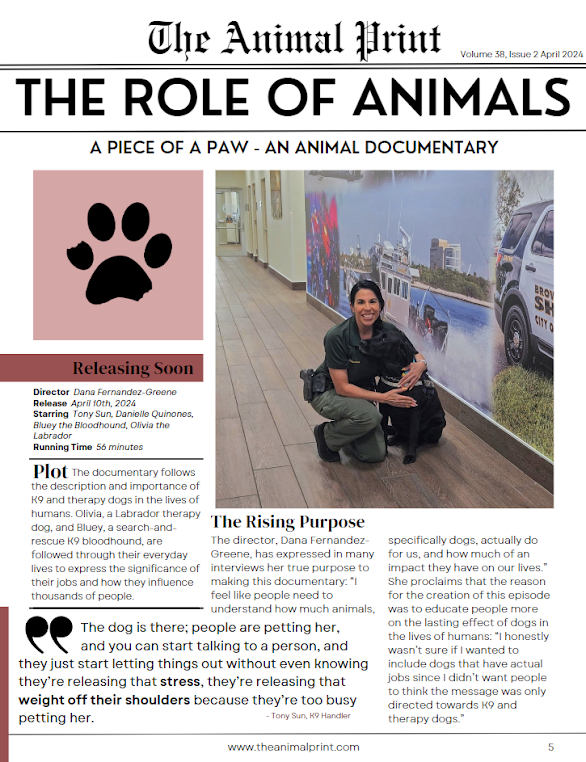
I don't know what to call this, but it is basically the little text that pops up, introducing the interviewees. Using text is one of my weakest simple areas in editing, at least with Adobe Premiere, so I decided to just do a very similar technique to what I did with my in-class documentary project.
Apart from what you see in the picture, I also made the title slide in and out, so it would look more realistic and like a real documentary.
- - - - - - - - - - - - - - - - - - - - - - - - - - - - - - - - - - - - - - - - - - - - - - - - - - - - - - - -
To finish this blog off, I want to say my future plans. Basically, the next time I edit, which will probably be tomorrow, I plan to find some fitting music and finish organizing my clips including the intertwining of the two interviews.


.jpg)


